FO4 CBBE Outfit With Cloth Physics
Article #5 in a 5-part series.
- 1 - Fallout 4 Combat Overhaul Part 1
- 2 - Fallout 4 Combat Overhaul Part 2
- 3 - Fallout 4 Holiday Edit
- 4 - FO4 Combat Overhaul 3
- 5 - this article
This guide shows the cloth-physics method to obtain breast physics on a CBBE outfit using Outfit Studio for Fallout 4. Why does an outfit need breast physics? So women dressed in cotton blouses aren’t mistaken for robots, or worse, synths!
prerequisites
- Caliente’s Beautiful Body Enhancer -CBBE- by Caliente and Ousnius
- BodySlide and Outfit Studio by Ousnius
- a CBBE outfit of your choice
- (optional) FO4Edit
- (optional) BSA Browser
I’m using “TheKite’s Handmaiden” by Niero and TheKite for an example outfit. I chose this as an example, because the outfit comes with multiple parts.
Overview
The method used here will be copying physics from the CBBE reference body to the outfit. Physics which optionally comes with CBBE uses cloth physics (applied to the body) to simulate breast movement and jiggle. Copying physics from the body to an outfit is simple, but comes with limitations.
Warning
- only one kind of cloth physics may be worn at a time
What this means is that if an outfit uses cloth physics for breasts, the character may not also equip cloth physics on a scarf or the coat-tail of an overcoat. Avoid equipping both else risk wild physics weirdness. The same holds for naked body using cloth physics (default if CBBE body built with physics using BodySlide) and putting on a coat or scarf with physics. A character may equip two distinct items both with exactly the same physics for breasts, but consider combining the two items into a single outfit for best results. I’ll go over the special case of multiple outfit pieces at the end.
BodySlide Preset tips
- the “(Outfit)” such as in “CBBE Slim (Outfit)” indicates supported breasts given by the outfit
- when building an outfit generally best to use an outfit preset unless the breasts are not supported at all
Step 0: Build Body (and outfit)
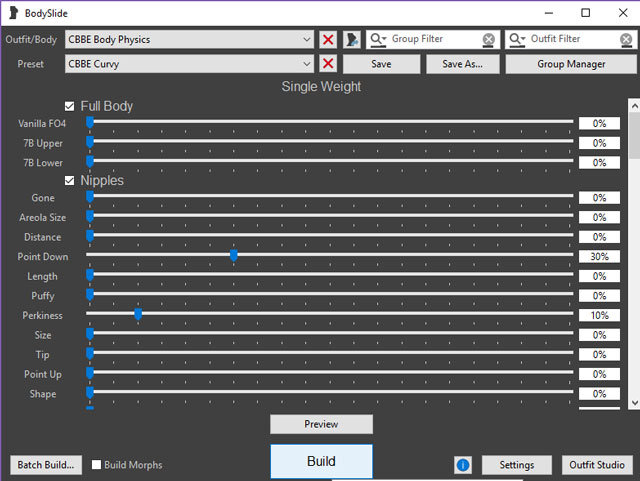
If you haven’t already done so, build the female naked body with physics using BodySlide. Start BodySlide (usually located in your game’s Data\Tools folder). For Outfit/Body select “CBBE Body Physics” then pick your Preset (I chose “CBBE Curvy”) then press the “Build” button. The outfit should use a similar preset or sliders.
Load the game and verify physics works on a naked female character.
If your outfit comes with BodySlide files then build your outfit. For best results your outfit should have the same or similar sliders. For my outfit, I chose preset “CBBE Curvy (Outfit)” to match my naked body which uses curvy preset. After outfit builds, a pop-up reveals the folder BodySlide saved the file to. Remember or record the folder location which you’ll need in Step 2.
Step 1: Locate Outfit and Backup
Keep a backup of the non-physics version of your outfit in case you need to start over or wish to make other changes. In case of mistake, may need to start over. Also, it’s easier to make changes, such as smoothing tool or combining pieces, on outfit without physics. Consider BodySlide files as a backup.
If your outfit does not come with BodySlide supporting files then locate the mesh file (extension .NIF). Normally these are located somewhere within the Data\meshes folder which may be under author’s or mod’s name, or within armor or clothes folder. The mod may install a loose file, or the file may be found within the BA2-file. If no loose file found, extract from BA2 as outlined below.
Help! Can’t find the file! FO4Edit to the rescue.
- start FO4Edit and select only the mod - wait to finish loading
- in left pane, expand “Armor Addon”
- select the outfit piece
- in right pane, locate “Female world model” - “MOD3 - Model Filename” and read the value after it
- the NIF-file will be found in Data\meshes\ + above value sub-folder
If the NIF is not found within as loose file in that folder then it’s likely in the archive, BA2-file within matching folder hierarchy.
Extract outfit NIF from BA2-file
The BA2 file is named the same as the plugin and may include “ - Main” at the end.
- use BSA Browser to open the file
- in left pane, navigate to Meshes then find outfit in right pane
- note the hierarchy of the file - this will be the folder location needed for Step 3
- right-click on the NIF and select “Extract Folders”
- choose your game’s Data folder
- verify the loose file stored in folder matching the hierarchy shown in BA2 Browser
Step 2: Load Reference Body
Remember to load the reference body first (for simplicity). Start Outfit Studio (using button in BodySlide or from Data\Tools folder).
- menu bar select File -> Load Reference…
- in the pop-up, click the “Browse” button and navigate to and select FemaleBody.nif found in **Data\meshes\actors\character\characterassets
Note: if using a unique-player (or follower) mod which has a modified shape or preset, and the outfit intended for that body shape, then load that body instead.
Step 3: Load Outfit and Identify Parts
- menu bar select File -> Load Outfit…
- click “Browse” and locate file noted in Step 1
You should now see the outfit (okay of reference body pokes through or if outfit floating above). In the “Meshes” tab under “New Outfit” there should be a reference body, CBBE, colored green followed by one or more outfit pieces. One of the pieces may be a copy of the body (named CBBE_outfit in my example) which shows in game as the body when wearing this oufit.
If outfit comes with multiple parts identify which parts will need physics - parts covering torso. Click on the eye-icon beside the part to hide in view to help identify it. Click twice more to display it again.
Step 4: Select Bones
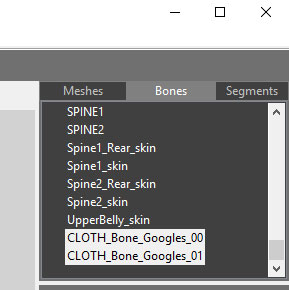
Select the “Bones” tab and scroll down. There should be two bones, CLOTH_Bone_Googles_00 and CLOTH_Bone_Googles_01. If missing then either the reference body was not loaded (no green CBBE), or the bady lacks physics. Start over at Step 0.
CTRL-click to select both CLOTH-bones and ensure only those two are highlighted.
Step 5: Copy Selected Weights
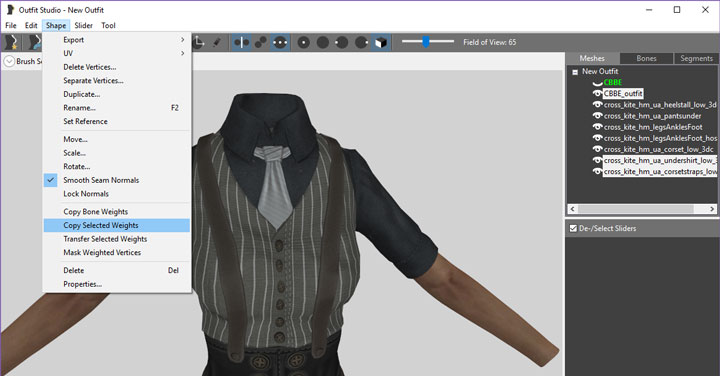
Return to the “Meshes” tab (those bones will stay selected). If you didn’t identify the parts needing physics in Step 3 then do so now. Find all the parts covering torso using the eye-icon to hide/reveal parts. In my example, the shirt and the straps cover the breasts. Main outfit with a copy of the body (usually) also needs to be included, and even if breasts are completely covered it’s safe to select the body copy anyway. Do NOT select the green CBBE reference body.
- CTRL-click select all the parts that need physics
- on menu bar, select Shape -> Copy Selected Weights
Do NOT choose “Copy Bone Weights” - use “Selected” weights to copy only the two selected bones from Step 4.
Step 6: Export
In menu bar, select File -> Export -> To Nif… and replace the outfit file.
If a pop-up message appears: a warning mentioning cloth physics (usually with a checkbox list) indicates a problem which could be caused by common errors: the reference CBBE was mistakenly included, made changes to the mesh after copying selected bone weights, or the outfit had existing cloth physics. Start over with the non-physics backup.
Step 7: Test
Load the game, don the outfit, check movement and jiggle. If the the outfit stretches or explodes then something went wrong - wrong bone weights, mixed physics, or the character has other physics-enabled clothing on. Remember: a character equipped with cloth physics for breasts (or naked body having cloth-style physics) cannot equip a coat with tail physics or a scarf with physics.
Special Case: multiple clothing items
Like having a vest worn over a shirt, or for a specific example see: “[Atom Girl Outfit][5]” by Deserter X. The main outfit in “Atom Girl” is a fishnet body stocking and the rest of the outfit uses other slots so may be worn or not. How do we handle this? The two choices: (1) combine the top and body stocking into the main outfit, or (2) apply physics to both clothing items. The first choice guarantees good physics and may be necessary in some cases. The second choice needs some extra care to avoid clipping or out-of-sync movement and for some outfits may not work. Choice 2 works for “Atom Girl” top and body stocking.
Doesn’t Choice 2 break the rule about all equipped gear limited to having a single cloth physics?
This is why at the beginning I phrased it as the “same kind” or applied to the same area equally. For best results consider these conditions:
- using BodySlide both pieces need to be built following same preset / sliders
- both outfits should reasonably cover the physics area without gaps
- snug fit is better - avoid expanding outer garment larger to reduce clipping
A large unzipped jacket (a gap exposing clothing beneath) over a tight outfit may not work. In that case better to leave jacket static and expand areas in Outfit Studio using brushes to reduce clipping with movement from breasts. Alternatively, try choice 1 - combine jacket and shirt together. In the case of “Atom Girl” top and body stocking choice 2 works well. The third condition about snug fit is for the goal of having both pieces move together so clipping will not happen. If pieces move out of sync then look at the first condition again - same preset / sliders means both should behave equally from the copied bones application.
How to Choice 1 - combine pieces for cloth physics
- start with both armor pieces without cloth physics
- Do Step 2 and Step 3 to load main outfit
- For second clothing item, repeat Step 3 but this time check the box for “Keep other shapes”
- do Step 4 and in Step 5 remember to select both main outfit and the second piece before copying
- in Step 6, export overwriting the main outfit
When equipping the main outfit the second piece should be include, both pieces with physics movement as one, because they are one.
How to Choice 2 - independent clothing items with physics
Start with both items without cloth physics. Do Step 1 - Step 6 for the main outfit then repeat Step 1 - Step 6 for second item. Test in game equipping both items to ensure no clipping, no deformations, no stretching, no wild exploding garments. If clipping, review that both items built with same preset and fit well. If crazy physics happens or all else fails then consider Choice 1.
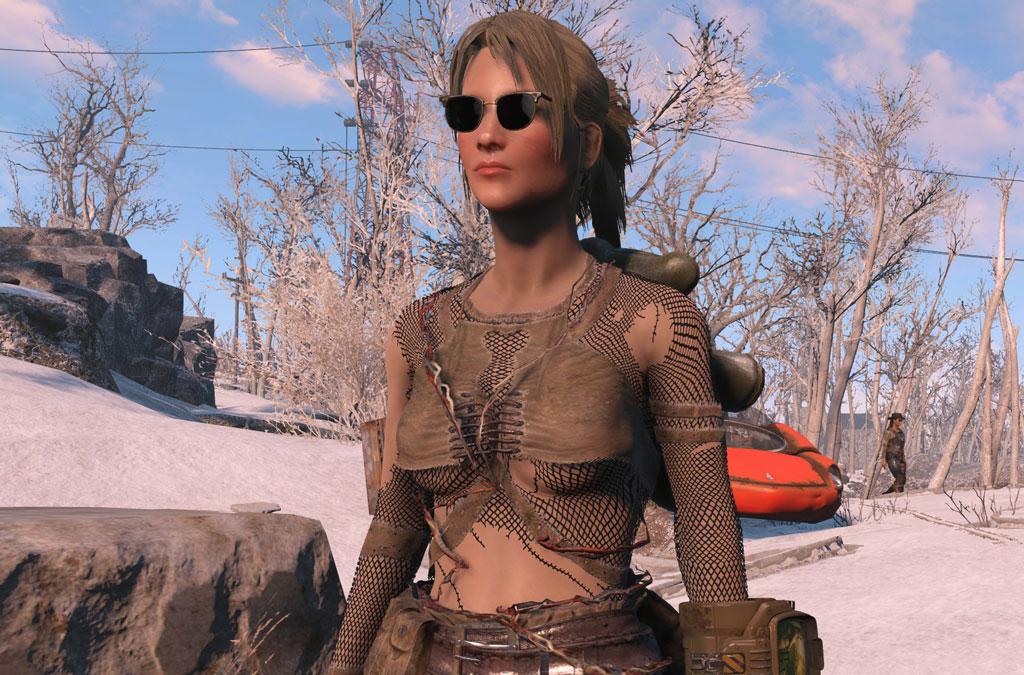
“Atom Girl Outfit” with “FO4 Seasons” winter landscape
Article #5 in a 5-part series.
- 1 - Fallout 4 Combat Overhaul Part 1
- 2 - Fallout 4 Combat Overhaul Part 2
- 3 - Fallout 4 Holiday Edit
- 4 - FO4 Combat Overhaul 3
- 5 - this article