ATS Gameplay Preferences
Update 2025: for game version 1.57
Western Star 49X in Idaho
American Truck Simulator (ATS) by SCS Software includes a number of preference options that can impact gameplay enjoyment or immersion. Besides supporting a variety controllers and button boxes to help immerse the player in driving a truck, gameplay preference options allow the player aids or go for a more authentic experience. This post covers some of the gameplay options I feel enhances the driving experience. With many configurable options, some of which I remained unaware of for some time after I first stared playing, I decided to create this post as a resources. First I cover the basics and realism then offer tips on adjusting field-of-view for single-screen users.
basics
Let’s start with basic and quality-of-life options. Once the player learns gameplay some reminders and pop-up selections may no longer be needed.
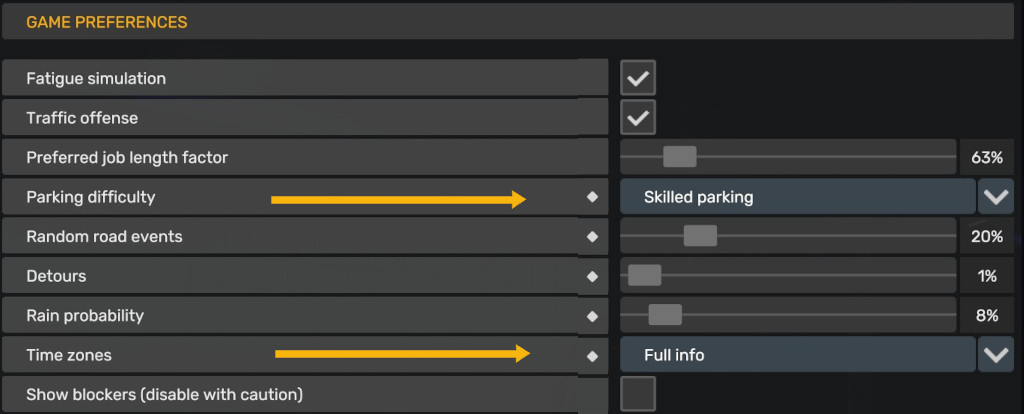
Gameplay - Parking difficulty: choose a default parking option–easy, skilled/dynamic, or random–to skip stopping at the entrance and go straight to the parking flag. However as of game version 1.57 this causes a pop-up to appear on-highway before reaching the destination, and if hauling dynamic cargo (such as log trailer) the truck may lurch to a stop. If either of these are a bother, consider setting to default.
Gameplay - Time Zones: having the time zone included may add convenience
Online - billboard ads: uncheck this box if you prefer restricting to in-game ads only
Other considerations: reduce detours chance or adjust road events as you see fit. After you have learned the game you may wish to Keep Route Adviser hidden (F3 to toggle), or disable Show blockers to hide those yellow x-marks and arrow-marks floating over the road.
advanced
By default vehicles switch from low-detail models to high-detail models noticebly close. If you wish, try increasing the distance. Edit the config.cfg file located in your documents, American Truck Simulator folder. Search by text and change the following values from 1.0 to 2.0.
useset g_lod_factor_parked "2.0"
useset g_lod_factor_traffic "2.0"
Remember the higher these values the more performance demanding.
realism
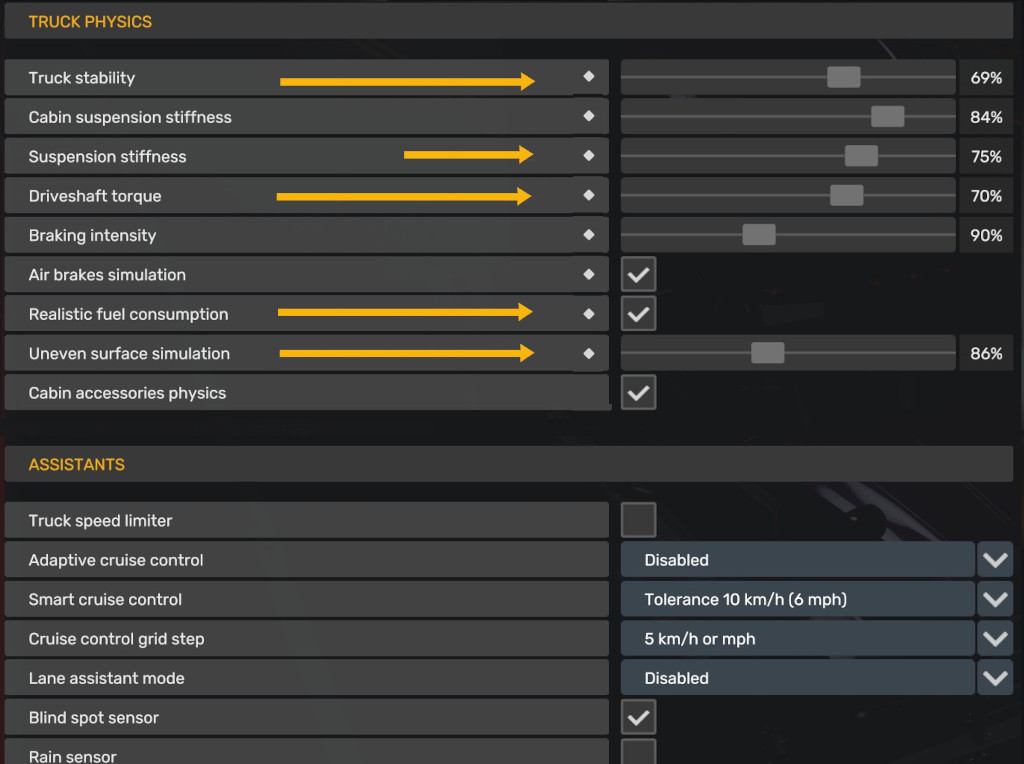
Gameplay - Truck and Trailer stability, Suspension stiffness: by default these are set to quite stable, but keep in mind “truck behavior is tuned to default physics settings” according to SCS Software developer, Max. Setting stability and suspension stiffness too low may exaggerate Driveshaft Torque and Uneven Surface simulation. When reducing stiffness or stability, try a little at a time then balance the other physics adjustments.
Gameplay - Driveshaft Torque: adjust to minimize twist when without a load
Gameplay - Cabin suspension stiffness: balance with your suspension stiffness
Gameplay - Uneven Surface: balance with your suspension stiffness, truck stability
Gameplay - Advanced trailer coupling: enable
Gameplay - Realistic fuel consumption: enable
Gameplay - ABS and Traction Control: enabled by default
Players using an H-shifter controller may want to choose manual transmission when driving truck having 10-, 13-, or 18-speed transmission. See guide by Outlaw Trucker on Steam for button assignments, and take notice:
- Shifter Toggle 1 is Range (as noted in tool-tip)
- Shifter Toggle 2 is Splitter (as noted in tool-tip)
- Shifter Position 1-6 should match your physical hardware then use shifter layout for when shifting in game
The game supports float (slip-shift) gearing by matching RPM of next gear, and by default using the clutch allows choosing a gear without matching RPM. To enforce RPM-matching, edit your profile’s local-config (or use console) and change the value from 1 (default) to 0 (zero):
g_hshifter_synchronized 0Players using paddles may find manual sequential annoying or less immersive, although Smart Sequential Shifting option makes an attempt at improving the experience. Modern trucks have been moving towards automated-manual transmissions so driving an automatic may arguably be more authentic. For two years I used manual sequential with paddles until a recent ATS update improved Real Automatic option, and after switching to Real Automatic I found the driving experience more enjoyable (although since then I now use an H-shifter in my primary truck). I like “normal power mode” where throttle control forces gear down for hillclimb or up on the descent, and using shift-hint buttons helps on hills. Assign a control to gear up and down to select forward gears, neutral, or reverse gears. Also consider assigning buttons for shift-up hint and shift-down hint.
Setting the transmission found in both Controls and Gameplay.
Gameplay - Transmission type: players with h-shifter driving truck with 10, 13, or 18-speed transmission choose Manual, or choose Real Automatic

Controls - Transmission: match your gameplay preference
Controls - Adaptive automatic transmissions: if using Real Automatic, choose normal or power
Keys & Buttons - Engine Brake Increase / Decrease and Engine Brake Toggle
Only rarely do American truck use retarders, so for immersion consider choosing a transmission without a retarder. On downhill with a heavy load use the engine (jake) brake. Set engine brake low or medium, and the Real Automatic transmission will drop a gear. Instead of the toggle consider assigning the increase and decrease selectors where first increase also enables then increase to 2 then 3.
Keys & Buttons - Windows: You may open and close the windows by assigning keys or buttons. I assigned the bracket keys for windows, because the shapes of brackets reminds me of windows. The directional buttons on an Xbox controller also seems appropriate.
Keys & Buttons - Rear Suspension Up/Down** (and Front Suspension Up/Down)
As of game version 1.44 (May 2022) assign keys or buttons to enable adjustable suspension height. When picking up a trailer, lower rear suspension (hold button or key) to get more clearance of fifth wheel beneath trailer then raise suspension. This might come in handy when trailer on uneven terrain sitting lower. May also assign keys or buttons for front suspension. By default when truck at higher speed the suspension returns to normal height. This auto-height can be overridden using console command or editing the main config.cfg, set g_suspension_auto_reset to 0 (zero).
in-cab (cockpit) view
I assume players using triple-screens or ultra-wide monitors know how to adjust their field-of-view (FoV) accordingly, so the following tips aimed at players using a single monitor with limited screen space. The goal is to reduce unnecessary heads-up-display (HUD) elements, dedicate more screen space to the road, and find FoV balance between realism and need-to-see quickly. Eyeballs provide a much wider field-of-view compared to a monitor, so on a realistic side the monitor should only show a narrow view directly in front. Too small a view and driving becomes dangerous without head-tracking or eye-tracking view aids. Here I provide tips to help make the view seem wider and finding a compromise. FoV is personal preference, so adjust and try out. I started out at 56 degrees then later tried lower values.
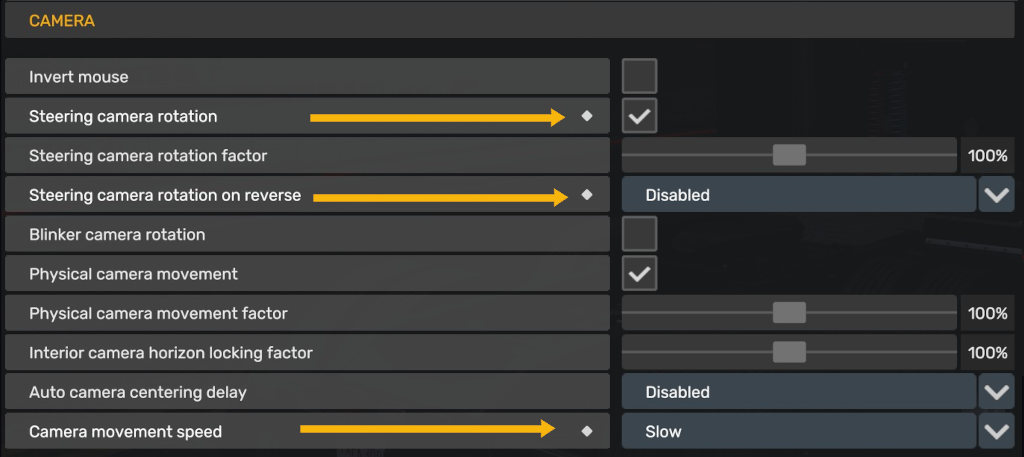
First, an option to help make a single-screen setup seem wider: steering camera rotation allows the view to shift as the steering wheel turns as if the driver looking into a turn. This helps reduce the sacrifice in view-space with lower FoV. Players using eye-tracking or head-tracking equipment may skip this.
Gameplay - Steering camera rotation: enable to allow look-ahead into turn
Steering camera rotation on reverse: set Disabled to make watching the review mirrors easier when backing
Camera Movement Speed: set to desired speed for when using interior camera quick-keys
I find the slow camera movement fairly quick so that’s what I chose.
Default F4 key opens Seat and Mirror Adjustments. Find the FoV adjustment within the Seat Adjustments as shown in the image below. Green box indicates common 16:9 aspect-ratio wide-screen view, and beyond is 21:9 ultra-wide. On a 16:9 I turned the head angle to look right just a bit. At 21:9 aspect-ratio I leave the head centered.
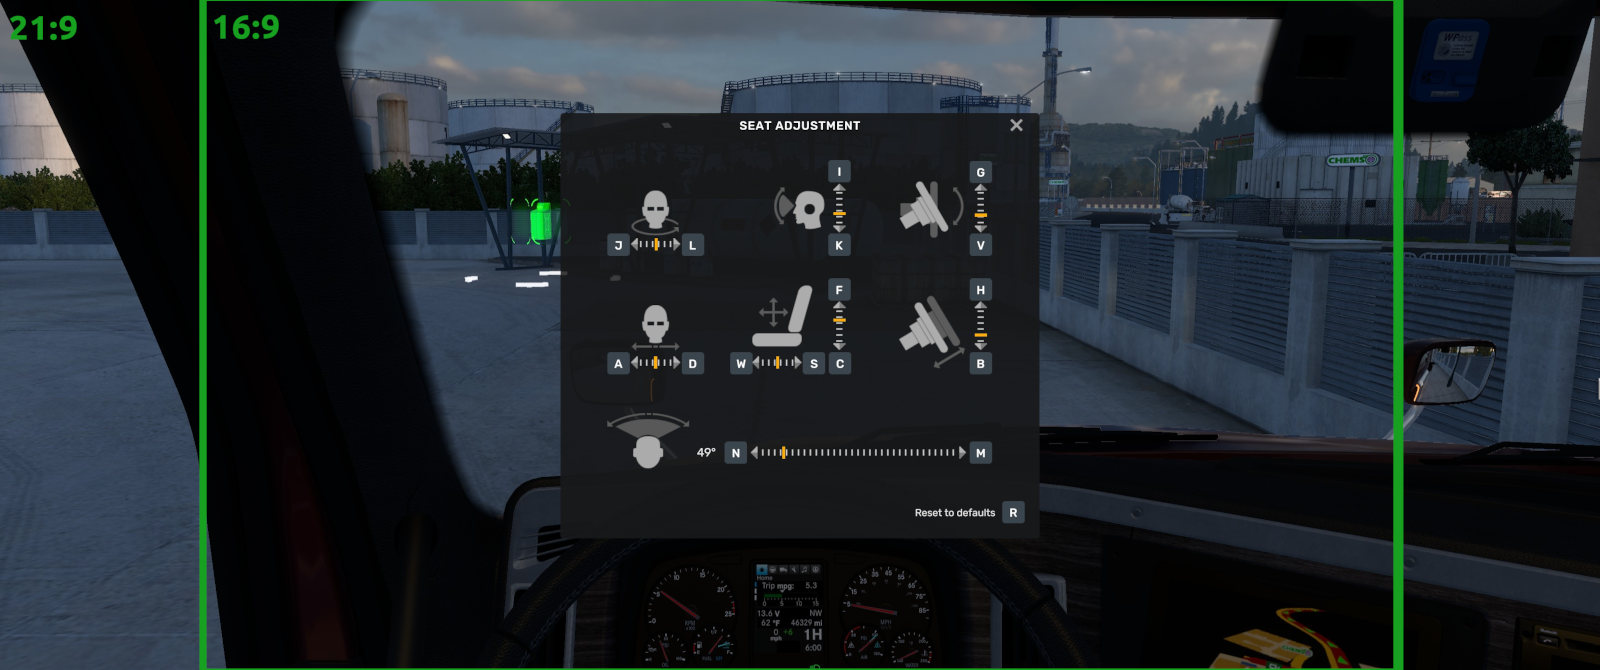
Western Star 49X seat position
After experimenting with several trucks, I first started with 56 degrees FoV and later reduced to around 50 degrees. Wider than I use in sim racing, because I want to view dashboard. Notice how the driver-side mirror is out of view. When turning left the mirror comes into view, but I highly recommend setting a control to quickly look left and right. My wheel controller includes a hat-switch, so I assigned the look-left and look-right to it. I generally adjust my seat up higher, and for some cabs a bit closer, to provide better view of the road and be similar to my view seated inside a real truck.
Consider reducing HUD elements and pop-up messages to maximize view of the road and dashboard.
F2 toggle-off virtual mirrors
Gameplay - Keep Route Advisor hidden: enable – use function keys to toggle advisor
Gameplay - Heavy cargo warning: un-check if your truck is up to the task
Tips:
- assign look left and look right, such as a hat-switch
- use number keys 7 and 9 (default) to quickly glance at side mirrors
- add hood mirror (adjust view down to see side of cab) to reduce blind spot and for immediate sight
Hood Mirrors
I find the default hood mirror adjustments too high for practical use of checking the blindspots beside the truck. Adjust much lower and outward. Check YouTube for videos of real truck drivers demonstrating mirror adjustments. Keep in mind that hood mirrors reduce performance which may become more noticeable in cities before sunrise of after sunset.
The Western Star 5700XE default seat positions seems too close to the dashboard. To achieve a similar view as in the 49X, I moved the seat nearly to the back and higher. Referencing real-world photos of drivers, it appears eye-level should be around the midpoint of the main mirror (not counting the small mirror). One or two clicks below the top puts the eye-level fairly close to the same area. One-to-three clicks from the back seems to provide a reasonable view for me. To view more gauges, without moving your head (VR), try bringing the steering wheel closer (making the wheel appear larger) so more gauges fit within.
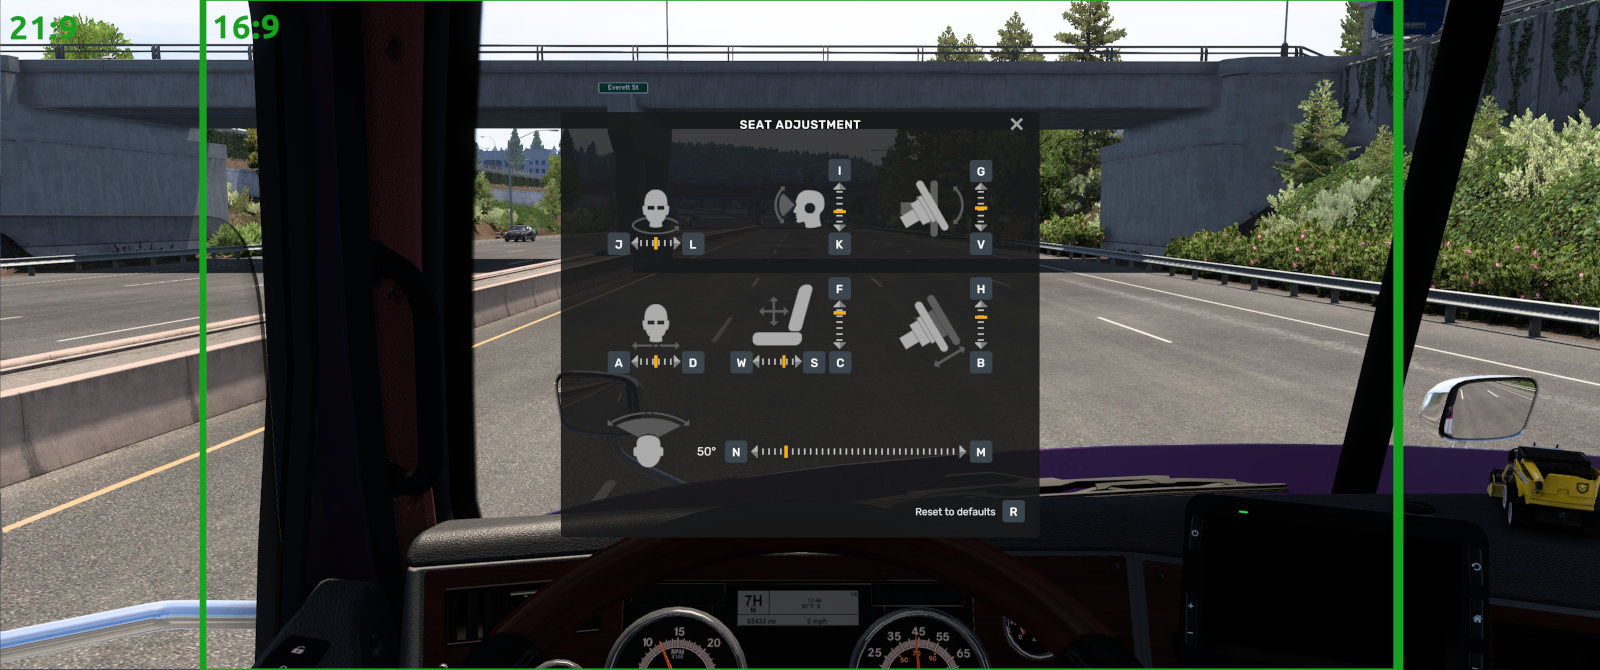
Western Star 5700XE seat position