Get Started with Dee Count
Organize
To help reduce errors when counting inventory, organize by dividing areas into sections small enough to quickly verify count. Dividing into small sections also helps finding misplaced products when reviewing totals after counting. In Dee Count, this section is called a “location” which may be a shelf, a clothing rack, a pallet, or a bin. You may attach a QR code to each location with a name or identification number to quickly scan the location name into Dee Count.
For this example, we’ll count inventory for a retail dance supply store which inventories shoes, clothing, and accessories. Each location will be a single shelf structure, a wire rack, or plastic shelving bin.
First location
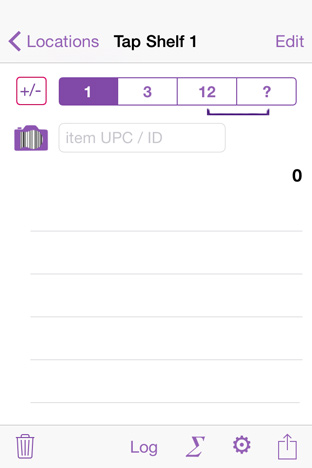
Dee Count starts with a single location in edit mode expecting a new name or location ID. For the dance store example, our first location is a shelf holding tap shoes which we’ll name, “Tap Shelf 1” and attach a QR code for identification. A location photo is optional, but may help with recognition or if the location ID becomes lost. Tap the camera icon to take a photograph, or tap the Edit button over the purple photo-placement to load a stored photo.
Tap the “Done” button to exit location editing and begin counting.
If categorizing items and all (or most all) the items at the location are of the same category, you may select the location’s default category by tapping the Category button at the bottom. Any uncategorized items added to this location will be placed into the selected default location category. Changing the location category later on will not change existing items, only items added thereafter allowing for locations containing items in multiple categories. You may also set the category for an item later on in the item details page.
Count location layout
Depending on if you are using an iPad or iPhone, some buttons may appear in different areas of the screen. On the iPhone, the menu buttons are found at the bottom while on the iPad most are at the top. Since the iPhone is much narrower, the location photo and count log may be hidden in some views. Tapping the Log button reveals the log. Tap the Counts button to return to the list of items. Alternatively, swipe left or right. On larger iPhones, everything may be visible in landscape at the cost of shorter log and item list.
Select a count-by quantity
Packages may contain multiple units. Tap the appropriate quantity, or tap ? to enter a custom value in the third position. For products without bar codes requiring a hand count, the custom count-by value may be handy to enter at once. Alternatively, you may use the increment feature to count a smaller set at a time. To increment by the selected count-by value, tap the item row and select ++ button. After adjusting the count-by quantity, tap the Item UPC/ID box to enter manually or with an external bar code reader, or tap the camera-code icon to scan bar codes with the device’s camera.
Scan each bar code and let the app count for you.
The item UPC/ID entry box will remain selected as each item is entered for quicker counting. Likewise, the camera view will remain while scanning until dismissed. When using the camera to scan bar codes, recognized codes will show a blue box. Tap the camera view to enter the code, and the blue box will flash green to indicate entry. Tapping helps prevent accidental counts while lining up the camera on shelves crowded with codes. Tapping the view also focuses the camera. Note that camera scanning depends on the quality of the bar code and room lighting.
For fastest results, use a Bluetooth bar code scanner.
While counting, a log shows the entries in reverse order, that is with the most recent addition at the top. The log helps review accidental double-counts or missed codes.
Fix a mistake
If you double-count or forget to adjust the count-by value, fix the error by using the Undo button, increment a count, or decrement a count. The Undo button is located at the bottom. If the on-screen keyboard is in the way, tap on something else or swipe down on the screen to push the keyboard away. Decrement a count by tapping the +/- button to toggle to decrement. The count-by values will turn red to remind you that you are decrementing and will revert to normal on entry. Scan a code again, or tap the item on the list to and select the +- button to decrement. If the item doesn’t belong here, delete by swiping left.

Verify location total
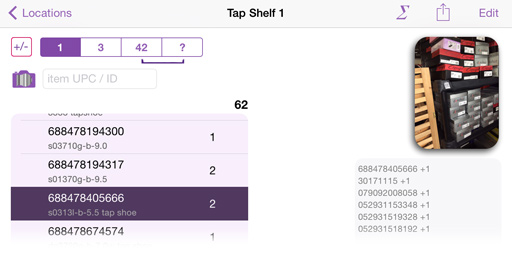
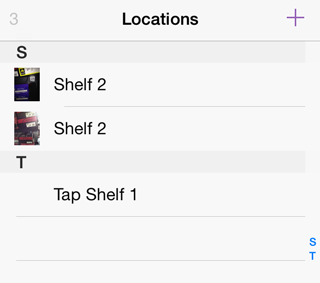
Upon finishing a location, you may hand count to verify the location total or compare the location total with a second device if using two devices. As seen in the screen shot below, Tap Shelf 1 has 61 tap shoes in a variety of styles and sizes. To count another location, return to Locations and tap the plus (+) button.
Review totals and item details
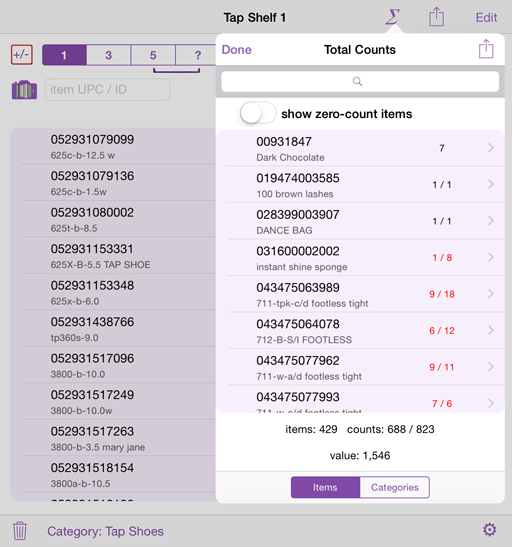
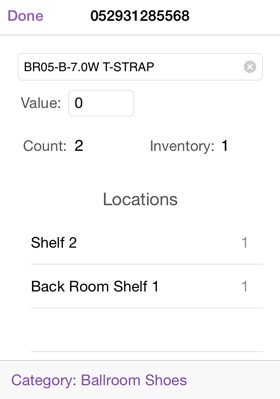
At any time, review the overall totals by tapping the Total Counts (∑) button. Search for an item using the search bar at the top, or scroll through the list. If categorizing items, switch to the category list and select a category to limit the total count by category. At the bottom is the total unique items and total items counted. Select an item to edit details or review all the locations the item was counted at. Tapping the location jumps to that location.
Totals may show count comparison value if comparison inventory quantity exists for the item. Obtain comparison values by importing a text file, or by resetting counts. See Comparing Counts for details.